Prepress & File Prep: How to Set Your Print Project Up for Success
If print has ever come back with colors off, text too close to the edge, or images looking fuzzy, the issue may have started before ink ever hit paper.
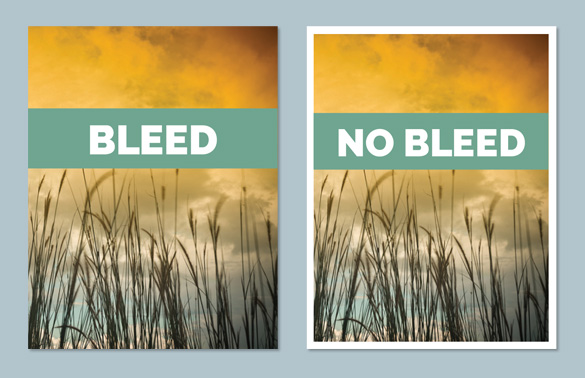
Good prepress helps your design move from screen to press with fewer surprises.
Print problems often show up at the end, but many of them begin at the file stage.
This is not about blame or doing files wrong. It is about understanding what print needs before production begins. A few small setup choices can save time, money, and frustration.
Prepress is the step between your design and the press. It is where files are checked, adjusted, and prepared so the finished piece prints cleanly, trims correctly, and matches expectations as closely as possible.
What is prepress?
Prepress is everything that happens before ink hits paper. It is the quality-control step for your files, and it helps confirm that the artwork is built for the way it will actually be printed, trimmed, finished, and delivered.
Prepress can include checking file size, reviewing layout, confirming color mode, verifying bleed and trim, checking image resolution, reviewing fonts, and preparing the final file for production.
What happens before printing?
A print project usually moves through a simple production path: design, prepress, print, finish, and deliver. Prepress is the checkpoint that helps catch problems while they are still fixable.
The file prep issues we see most often
Most production problems come from a handful of setup details. These are the ones worth checking before you upload a file.
1. Bleed
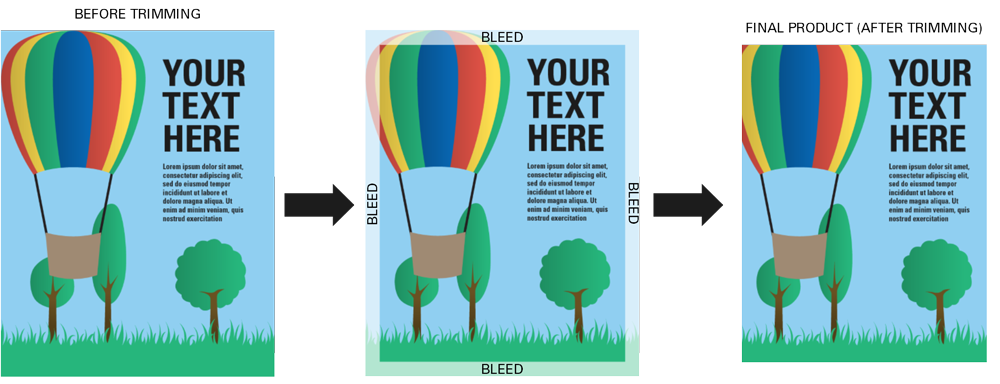
Bleed is the extra artwork that extends beyond the trim edge. Add 1/8 inch, or 0.125 inch, bleed on all sides and extend backgrounds, colors, and images fully into that area.
2. Trim size
Trim size is the final finished size. Set your document to the final trim size, then add bleed separately instead of manually enlarging the whole page.
3. Color mode
Screens use RGB light. Printers use CMYK ink. Files meant for print should be set up in CMYK when possible to reduce unexpected color shifts.
4. Image resolution
Images should generally be 300 dpi at final print size. Avoid enlarging small images, screenshots, or web graphics beyond what they can hold cleanly.
5. Fonts
Missing fonts can cause text reflow, substituted typefaces, and spacing changes. Embed fonts when exporting PDFs or outline fonts when required.
6. PDF export
Not all PDFs are created equal. PDF/X-1a or PDF/X-4 is often a strong choice for print, depending on the project and production path.
If artwork touches the edge, it needs bleed. The safe zone is the area inside the trim edge where important text, logos, and details should stay so they are not cut off during trimming.
Upload it and Voom can take a look before production.
How Voom reviews print files
At Voom, prepress is built into our process. Our team reviews files, flags potential issues early, fixes what we can, and reaches out when something needs attention.
- File review. Voom checks for common production issues like missing bleed, wrong size, low-resolution images, color concerns, and font problems.
- Prepress adjustment. When possible, our team makes practical fixes that help the file move cleanly into production.
- Question or approval. If something could affect the finished piece, Voom reaches out before moving forward.
- Production setup. Once the file is ready, it is prepared for the right print method, material, finishing steps, and delivery plan.
Why prepress saves money quietly
Good file prep reduces reprints, prevents delays, speeds up production, and keeps projects on budget. It is not about being picky. It is about efficiency.
A file that is built correctly gives the production team fewer problems to solve and gives your finished piece a better chance of looking the way you expected.
You do not have to be a print expert to get great results. You just need to know what print needs.
Prepress quick checklist
Before uploading artwork, take one last pass through the essentials. A few minutes here can prevent a lot of back-and-forth later.
- Trim size is correct
- 0.125 inch bleed is added where needed
- Important text and logos stay inside the safe zone
- Images are high enough resolution
- Colors are set up for print
- Fonts are embedded or outlined
- PDF is exported correctly
The takeaway: prepress is your safety net
A little attention in prepress goes a long way on press. Bleed, trim, resolution, color, fonts, and export settings may feel small, but they can make a real difference in how smoothly your project moves through production.
If you ever have questions about file setup, bleed, color, or export settings, talk to a Voomie. We are always happy to help before things go to print.
Prepress & file prep FAQs
What does prepress mean?
Prepress is the file review and preparation step before printing. It helps confirm that artwork is sized, colored, exported, and built correctly for production.
How much bleed should I add?
A common print guideline is 1/8 inch, or 0.125 inch, of bleed on all sides. Some projects may require more depending on the material and finishing.
Should print files be RGB or CMYK?
CMYK is the standard color mode for most print projects. RGB is built for screens, and colors may shift when converted for print.
What resolution should images be?
Images should generally be 300 dpi at the final printed size. Large format projects can vary depending on viewing distance and production method.
Do fonts need to be embedded?
Yes. Embedding fonts helps prevent font substitutions, text reflow, and spacing issues. Outlining fonts may also be useful when required.
Can Voom check my file before printing?
Yes. Voom reviews files before production and can flag issues like missing bleed, low-resolution images, color concerns, font problems, or export issues.
Not sure if your file is print ready?
Send it to Voom before production. We can help check bleed, trim, color, resolution, fonts, export settings, and other details that affect how your project prints.